Dead Cells: Unlocking the Daily Challenge blueprints in the bugged Linux GOG version
Dead Cells has a Daily Challenge or Daily Run mode, but it is just a minor optional part. Except that is required in order to unlock three weapons (“blueprints”) for the main game. Just by starting a Daily Run on different days unlocks the following blueprints:
- Swift Sword (internal name
SpeedBlade) the first time - Lacerating Aura (internal name
DamageAura) after the fifth time - Meat Skewer (internal name
DashSword) after ten starts
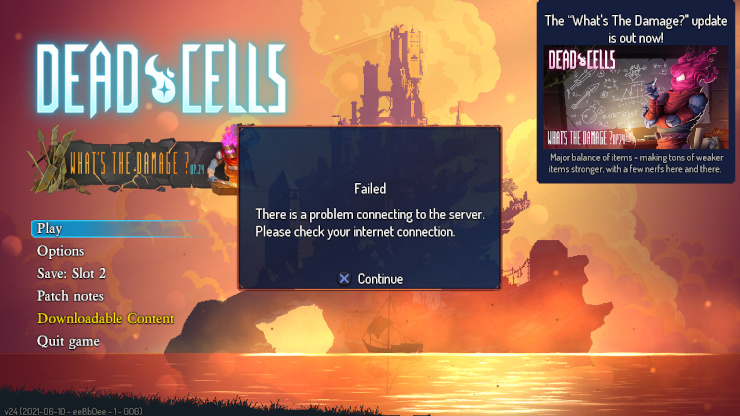
However, specifically the Linux version on GOG has an issue where it is impossible to start the Daily Challenge. The Linux version on Steam is not affected. To use anything online-related in Dead Cells – which thankfully is not a lot as it is a local single-player game – the GOG GALAXY client is required. Which does not exist for Linux. Until a GOG GALAXY client for Linux is released, I probably should not buy games from GOG anymore and just go with Steam, because otherwise I cannot trust that all features will work. Which is a pitty because I really like GOG for being DRM-free.
The Dead Cells issue is known for years and by now it seems rather unlikely it will be fixed. At some point a note was added to the store page:
Additional Notes: Galaxy client is required to access Daily Runs and Streaming features.
Let's hack the game
At the point of writing I was using Ubuntu 20.04.2 and the Dead Cells game version 1.14.0 / v24. You will need a hex editor which can handle big files of around 1 GB. I used and can recommend GHex. You can install it with:
$ sudo apt install ghex
In the rest of the article when I use a relative path, assume it is relative to the game installation directory, which in my case is ~/GOG Games/Dead Cells/.
First you should create a backup of the file game/res.pak because we will edit it and any mistake will lead to the game crashing. If that happens just replace the edited file with your backup. Or if you do not have one, reinstall the game. While you are at it, you might as well backup your saves – that is the directory game/save/.
This is the plan:
- Find out the internal names of the desired blueprints.
- Assign them to a common enemy as an often dropped reward.
- Play the game to unlock it. Repeat this until all 3 are unlocked.
The tricky part is, that the edited file has to be the exact same size as before. My guess is this has to do with internal offsets for parsing, because res.pak is a container for many different files. The part we are going to edit belongs to a JSON file called data.cdb.
Step 1: Daily Reward blueprint names
When you open game/res.pak in GHex you just have to search for “dailyReward”. You will find a JSON list with the blueprints. Nicely formatted the section looks like this:
"name": "dailyReward",
"lines":
[
    {
        "item": "SpeedBlade",
        "step": 1
    },
    {
        "item": "DamageAura",
        "step": 5
    },
    {
        "item": "DashSword",
        "step": 10
    }
]
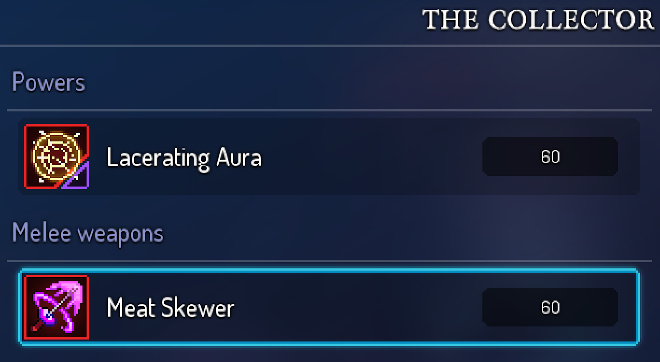
One trick that almost worked, was to set "step": 0. I started the game, tried unsuccessfully to start a Daily Run, and then found the SpeedBlade to be available at The Collector. However, it only worked for this one blueprint and not the other two.
Step 2: Assign to enemy
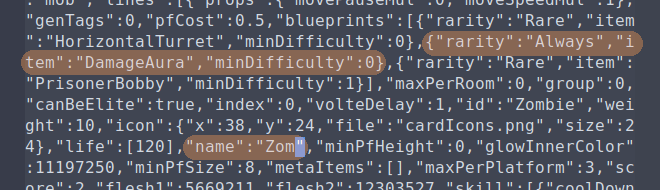
The most common enemy which also drops blueprints is the Zombie. Let us have a look at the relevant part of its JSON description:
"blueprints":
[
    {
        "rarity": "Rare",
        "item": "HorizontalTurret",
        "minDifficulty": 0
    },
    {
        "rarity": "Always",
        "item": "Bleeder",
        "minDifficulty": 0
    },
    {
        "rarity": "Rare",
        "item": "PrisonerBobby",
        "minDifficulty": 1
    }
],
"id": "Zombie",
"name": "Zombie"
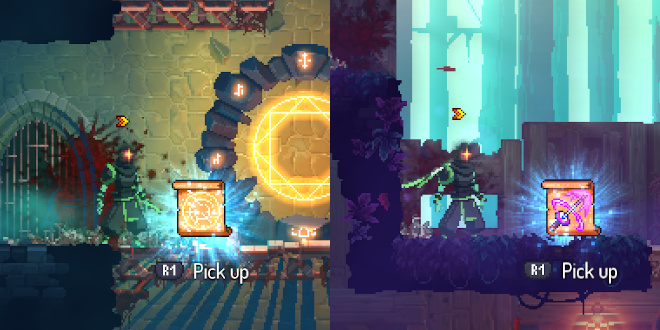
The Bleeder entry looks like the perfect target to be replaced. “Always” does not actually mean the blueprint is always dropped, but it has a very decent chance. When I played to unlock, I actually got the item while still in the first level each time – just not directly from the first few enemies.
But keep in mind: The resulting file has to be the same size as before. Changing too much will just make everything harder on us. Bleeder is 7 characters long while SpeedBlade and DamageAura have a length of 10, and DashSword has 9 characters. To counter-balance that, I shortened the name “Zombie” by the difference. An example:
"blueprints":
[
    {
        "rarity": "Rare",
        "item": "HorizontalTurret",
        "minDifficulty": 0
    },
    {
        "rarity": "Always",
        "item": "DamageAura",
        "minDifficulty": 0
    },
    {
        "rarity": "Rare",
        "item": "PrisonerBobby",
        "minDifficulty": 1
    }
],
"id": "Zombie",
"name": "Zom"
A screenshot from the edited part in GHex (highlighted areas by me):
Step 3: Play the game
I just did some runs on the lowest difficulty. Once unlocked – or to be more precise: once the blueprints are available at The Collector – you can replace the edited res.pak with the original again. The blueprints will stay.
CellPacker
While it did not work for editing, CellPacker was a great help because I could use it to extract the data.cdb file. It is a lot more comfortable having an auto-formatted JSON file at hand. What did not work for me was to repackage res.pak with the tool – the operation required a whopping 12 GB RAM and the game crashed using the file.
Resources
- r/deadcells: Daily Challenge mode doesn't work on the Linux GOG version of the game
- r/deadcells: Editing save files
- github.com/ReBuilders101/CellPacker
Related article: Dead Cells: PS4 controller support on Linux