sebadorn.de

Dead Cells: Unlocking the Daily Challenge blueprints in the bugged Linux GOG version

Dead Cells error message.

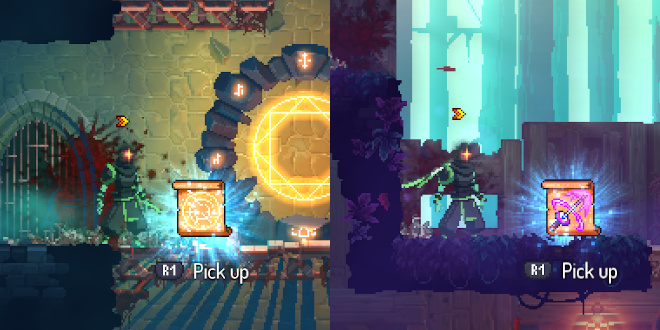
Dead Cells has a Daily Challenge or Daily Run mode, but it is just a minor optional part. Except that is required in order to unlock three weapons (“blueprints”) for the main game. Just by starting a Daily Run on different days unlocks the following blueprints:

  1. Swift Sword (internal name SpeedBlade) the first time
  2. Lacerating Aura (internal name DamageAura) after the fifth time
  3. Meat Skewer (internal name DashSword) after ten starts

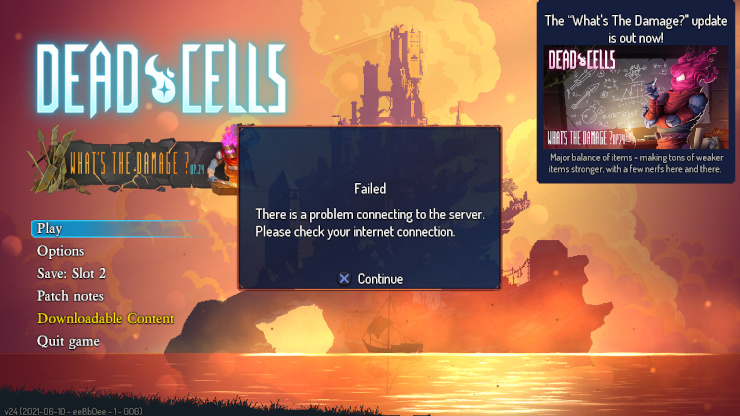
However, specifically the Linux version on GOG has an issue where it is impossible to start the Daily Challenge. The Linux version on Steam is not affected. To use anything online-related in Dead Cells – which thankfully is not a lot as it is a local single-player game – the GOG GALAXY client is required. Which does not exist for Linux. Until a GOG GALAXY client for Linux is released, I probably should not buy games from GOG any­more and just go with Steam, because otherwise I cannot trust that all features will work. Which is a pitty because I really like GOG for being DRM-free.

The Dead Cells issue is known for years and by now it seems rather unlikely it will be fixed. At some point a note was added to the store page:

Additional Notes: Galaxy client is required to access Daily Runs and Streaming features.

Let's hack the game

The blueprints dropped in a level.

At the point of writing I was using Ubuntu 20.04.2 and the Dead Cells game version 1.14.0 / v24. You will need a hex editor which can handle big files of around 1 GB. I used and can recommend GHex. You can install it with:

$ sudo apt install ghex
Read more

And then it was gone – Notes about developing my js13k entry of 2020

Start screen of my game.

This was the 3rd time I participated in the js13kGames game jam, so I was already aware of one thing: The size limit isn't my greatest problem, at least not to the extent of having to do code golfing right out of the gate. Instead I should make sure to have a good code base – multiple files for classes and namespaces as needed, named constants/variables instead of hardcoded values.

One really big advantage was, that I had already implemented things like an input system for keyboard and gamepad, and 2D collision detection in other projects of mine. I could just reuse some code with minor adjustments and save quite some time.

1. Improvement through little things

First some ideas on how to improve the general impression of the game, even though the player may not be actively aware of them.

Details to make the scene more alive. Especially animations can play a big role, and having a somewhat self-consistent art style – e. g. having a super detailed character would clash with uni-colored blocks as platforms. Some small details here are:

  • Standing on a platform and pressing down makes the character look down.
  • The character torso slowly bops up and down for breathing.
  • The character blinks.
  • Little dust clouds rise up when jumping.
  • Breaking platforms have little dust clouds.
  • The background moves slower than the foreground, giving a little sense of distance.

Coyote time. Directly after walking of a platform, the player still has a few frames time to jump even though the character isn't on ground anymore.

The game is paused when a gamepad is disconnected. If a gamepad was connected, it may have been used for playing the game. Let's assume it getting disconnected mid-game is an accident.

Pause screen.

Pausing means not doing anything (or not much). If a game is a bit more taxing and makes the CPU or GPU sweat, it's good to have the possibility to give it a break and let the temperature drop down again. If you have a pause option – which on its own is already good – it should truly pause and not keep rendering a complex scene.

I went a bit further. When paused, the game renders the pause screen once and then stops the main loop – no updates, no rendering. The game only keeps listening for key events and does a slower gamepad polling to know when to continue.

2. Watch your (time) step

It did not happen a lot, but some entries did not account for different monitor refresh rates. So when the game was developed for 60 FPS, and it maxed out at 144 FPS on my system, the game ran too fast. In the best case animations just looked weird, but mostly it meant having a hard time with the controls.

The solution is to develop for a certain frame rate and introduce a time factor to account for differences. This factor is then used when updating the physics and animation progresses. In the following example that factor is the variable dt. If the target FPS is 60 and the game runs at 120, dt would be 0.5. Because the update and draw functions are called twice as often as targeted, the progress has to be slowed down by half.

js13k.Renderer = {

	/**
	 * Start the main loop. Update logic, render to the canvas.
	 * @param {number} [timestamp = 0]
	 */
	mainLoop( timestamp = 0 ) {
		js13k.Input.update();

		if( timestamp && this.last ) {
			// Time that passed between frames. [ms]
			const timeElapsed = timestamp - this.last;

			// Target speed of 60 FPS (=> 1000 / 60 ~= 16.667 [ms]).
			const dt = timeElapsed / ( 1000 / js13k.TARGET_FPS );

			// update and draw the level …
			this.update( dt );
			this.draw();
		}

		this.last = timestamp;

		requestAnimationFrame( t => this.mainLoop( t ) );
	}

};

I am not saying my solution is the best way to do it. It is short and works well enough, though. An excellent article on the topic is: Fix Your Timestep! by Glenn Fiedler

3. Improving performance

When I started drawing the spikes with lineTo() calls, the performance went noticably down. But since most level objects did not change, they could be cached by pre-rendering them to an invisible canvas. This unchanging canvas is then used in the main loop with drawImage().

/**
 * Render an object to an offscreen canvas.
 * @param  {js13k.LevelObject} o
 * @param  {number}            o.w - Width.
 * @param  {number}            o.h - Height.
 * @return {HTMLCanvasElement}
 */
function toOffscreenCanvas( o ) {
	// This canvas is never added to the document body.
	const canvas = document.createElement( 'canvas' );
	canvas.width = o.w;
	canvas.height = o.h;

	const ctx = canvas.getContext( '2d' );
	ctx.imageSmoothingEnabled = false;
	o.draw( ctx );

	return canvas;
}

The best part: This pre-rendered image can still be used for the breaking animation. The shaking before breaking apart is just a randomized offset in the drawing position, and breaking it in half means two drawImage() calls – one for the left half and one for the right half, cutting the image in half.

Another optimization: Only render what is currently in the viewport. The levels in my game are long, there is never everything at once on the screen. So before drawing a platform or an effect, there is a check if at least some part of the bounding box is inside the current viewport.

/**
 * Draw an object only if it is inside the visible viewport area.
 * @param {CanvasRenderingContext2d} ctx
 * @param {number}                   vpX - Viewport X offset.
 * @param {number}                   vpW - Viewport width.
 * @param {number}                   vpY - Viewport Y offset.
 * @param {number}                   vpH - Viewport height.
 * @param {js13k.LevelObject}        o
 * @param {number}                   o.x - X position in level.
 * @param {number}                   o.y - Y position in level.
 * @param {number}                   o.w - Width.
 * @param {number}                   o.h - Height.
 */
function drawIfVisible( ctx, vpX, vpW, vpY, vpH, o ) {
	if(
		// outside the viewport to the right
		o.x > vpX + vpW ||
		// outside the viewport to the left
		o.x + o.w < vpX
	) {
		return;
	}

	if(
		// outside the viewport to the bottom
		o.y > vpY + vpH ||
		// outside the viewport to the top
		o.y + o.y < vpY
	) {
		return;
	}

	o.draw( ctx );
}

4. What could have been better

One of my main goals were good controls. Moving and jumping should feel amazing. I did not reach that goal and had to settle with good enough. I even reinstalled Celeste to compare how the character controls felt and what was possible: Could you still change direction mid-air when falling after a jump? (Yes.)

Falling of a block while steering in a direction still looks strange as the character more glides away than falls down.

Hanging on a wall.

One big-ish decision was to allow multiple wall jumps up the same wall. In a way it is a bad design decision: On one hand there is a time limit until the character loses grip and slides down; on the other hand they can just jump up and cling to the same wall higher up again. But it just felt better and didn't make the game that much easier. All levels are still solvable without using this “trick”.

An optimization area I neglected was memory and garbage collection. In Firefox and on a really old laptop I noticed some micro stutters and lost frames, making the scene suddenly skip. In a game about precise platforming this is a little disaster. From what I read here and there, these stutters could be caused by garbage collection. Some untested thoughts on what to improve:

  • Not deleting destroyed platforms, just keep them flagged as such so they are not updated anymore and skipped in rendering.
  • On level begin create a pool of effects – like the dust clouds from jumping – and reuse them instead of creating them when the jump happens.

The second level goes vertically upwards. When the player is already at a higher checkpoint and falls down, it is better for them to not land on a previous checkpoint and instead directly fall to their death. Otherwise they are back at this previous checkpoint. That is just frustrating. Older checkpoints should not overwrite later ones.

Player character.

The voting for this year's competition is still under way. Articles by other participants can be found on js13kgames.github.io/resources/.


Resources


Changing the message language for Bash

The system language of my Ubuntu installation is set to German. Per default this also means that my command line output is in German if the application supports it. This can be a bit of a hindrance when developing, because error messages and warnings will also be in German which makes it harder to search for solutions – most discussions in help forums and blogs are in English.

So let's change the terminal language. In your ~/.bashrc file add the following lines:

unset LC_ALL
export LC_MESSAGES=C

If LC_ALL had a value, it would overwrite the setting for LC_MESSAGES, so it has to be unset first. I first tried setting LC_ALL=C, but this had the undesired side effect of certain keys behaving differently. I have a German keyboard with QWERTZ layout, but keys like “ä”, “ö”, “ü” suddenly did different things. I can only assume I would have run into some other issues as well. So keep it simple and just change the messages.

The next terminal you open will have the setting applied. Also note that this only affects your terminal and no other applications – except those launched from said terminal.

To check your language settings you can use locale. My output using Bash looks like this:

$ locale
LANG=de_DE.UTF-8
LANGUAGE=de_DE:en
LC_CTYPE="de_DE.UTF-8"
LC_NUMERIC=de_DE.UTF-8
LC_TIME=de_DE.UTF-8
LC_COLLATE="de_DE.UTF-8"
LC_MONETARY=de_DE.UTF-8
LC_MESSAGES=C
LC_PAPER=de_DE.UTF-8
LC_NAME=de_DE.UTF-8
LC_ADDRESS=de_DE.UTF-8
LC_TELEPHONE=de_DE.UTF-8
LC_MEASUREMENT=de_DE.UTF-8
LC_IDENTIFICATION=de_DE.UTF-8
LC_ALL=

Side note: I also tried LC_MESSAGES=en_US.UTF-8, but that didn't work – no idea why. I also didn't look further into it since I have a working solution.

Sources


js13kGames: Tricks applied in Risky Nav

Risky Nav

From the 13th August to the 13th September I participated in the js13kGames competition. My entry Risky Nav can be seen here and the source code is on GitHub here. In this blog post I will explain some of the tricks and techniques I used in making my game.

The game is tile based, so everything – player, monsters, goal – is always positioned at a (x, y) position on a 2D map.

About the background

The background is a single image which is created once right at the beginning. It is drawn on a canvas and each tile is 1px big. In the rendering loop it is then up-scaled to the desired tile size. To avoid a blurry image, it is necessary to disable anti-aliasing.

context.imageSmoothingEnabled = false;

let w = bgCanvas.width * tileWidth;
let h = bgCanvas.height * tileHeight;

function renderLoop() {
    context.drawImage( bgCanvas, 0, 0, w, h );
}

About the fog/shadow

The fog/shadow around the player is done in a similar way as the background. The image is pre-rendered with each tile being 1px and then up-scaled in the main loop. But it moves with the player. The darkness is determined by the euclidean distance from the player.

for( let y = 0; y < fogMapHeight; y++ ) {
    for( let x = 0; x < fogMapWidth; x++ ) {
        // Euclidean distance from origin.
        let de = Math.sqrt( x * x + y * y );

        // Darkness only starts 2 tiles away from the player.
        // f has to be a value between 0 and 1.
        let f = ( de < 2 ) ? 0 : Math.min( 1.15 - Math.min( 3 / de, 1 ), 1 );
        fogCtx.fillStyle = `rgba(0,0,0,${f})`;
        fogCtx.fillRect( x, y, 1, 1 );
    }
}
Read more

Dead Cells: PS4 controller support on Linux

Dead Cells is a game, it is really good, and it is available for Linux. However right after installation (version 1.0 from GOG) it did not recognize my PS4 controller. It could not be a problem with the controller itself or Linux in general, because the DS4 worked with other applications – for example it showed up perfectly fine in jstest-gtk (0.1.0).

After some research I came across this reddit post. Dead Cells uses the SDL library, so maybe that's it. I followed the instructions and built and ran sdl2-jstest. The output should contain an entry like this for the DS4 (2nd gen):

Joystick Name:     'Sony Interactive Entertainment Wireless Controller'
Joystick GUID:     030000004c050000cc09000011810000
Joystick Number:    0
Number of Axes:     6
Number of Buttons: 13
Number of Hats:     1
Number of Balls:    0
GameControllerConfig:
  Name:    'PS4 Controller'
  Mapping: '030000004c050000cc09000011810000,PS4 Controller,a:b0,b:b1,back:b8,dpdown:h0.4,dpleft:h0.8,dpright:h0.2,dpup:h0.1,guide:b10,leftshoulder:b4,leftstick:b11,lefttrigger:a2,leftx:a0,lefty:a1,rightshoulder:b5,rightstick:b12,righttrigger:a5,rightx:a3,righty:a4,start:b9,x:b3,y:b2,platform:Linux,'

… or like this for the DS4 (1st gen):

Joystick Name:     'Sony Computer Entertainment Wireless Controller'
Joystick GUID:     030000004c050000c405000011810000
Joystick Number:    0
Number of Axes:     6
Number of Buttons: 13
Number of Hats:     1
Number of Balls:    0
GameControllerConfig:
  Name:    'PS4 Controller'
  Mapping: '030000004c050000c405000011810000,PS4 Controller,a:b0,b:b1,back:b8,dpdown:h0.4,dpleft:h0.8,dpright:h0.2,dpup:h0.1,guide:b10,leftshoulder:b4,leftstick:b11,lefttrigger:a2,leftx:a0,lefty:a1,rightshoulder:b5,rightstick:b12,righttrigger:a5,rightx:a3,righty:a4,start:b9,x:b3,y:b2,platform:Linux,'

Take the value behind Mapping and add a line in your /etc/environment file like this:

SDL_GAMECONTROLLERCONFIG='030000004c050000cc09000011810000,PS4 Controller,a:b0,b:b1,back:b8,dpdown:h0.4,dpleft:h0.8,dpright:h0.2,dpup:h0.1,guide:b10,leftshoulder:b4,leftstick:b11,lefttrigger:a2,leftx:a0,lefty:a1,rightshoulder:b5,rightstick:b12,righttrigger:a5,rightx:a3,righty:a4,start:b9,x:b3,y:b2,platform:Linux,'

After the next reboot everything should be working. Or if you want to test it right away without reboot, then you can just add it to the start script of the game. Assuming you used the standard installation path from the GOG installer, the file is located at ~/GOG Games/Dead Cells/start.sh. Change the file so it now begins with:

#!/bin/bash
# GOG.com (www.gog.com)
# Game

export SDL_GAMECONTROLLERCONFIG='030000004c050000cc09000011810000,PS4 Controller,a:b0,b:b1,back:b8,dpdown:h0.4,dpleft:h0.8,dpright:h0.2,dpup:h0.1,guide:b10,leftshoulder:b4,leftstick:b11,lefttrigger:a2,leftx:a0,lefty:a1,rightshoulder:b5,rightstick:b12,righttrigger:a5,rightx:a3,righty:a4,start:b9,x:b3,y:b2,platform:Linux,'

That's what worked for me. If it still doesn't for you, try adding some udev rules as described in my article Using NW.js to communicate with a DS4 controller.